
Thursday, May 27, 2010
Babydoll dress
I bought this super cute knit toile fabric about 6 months ago. I found it on this website called SewZannes. Lots of super cute knits if you are into that. Toile is usually in home decorator fabrics or cottons, so the fact that I found one in a knit was super exciting to me. Im a nerd, I know. It's ok, I deal with it on a daily basis. Anywho, I saw a dress on Etsy that I really like but was totally not willing to pay $85 for a dress. Plus making it myself, means I can customize it to my hearts desire. So I decided Id finally use the toile I bought forever ago, to make the bottom portion of the dress. A friend of mine bought me some pink bunny buttons, that Ive been holding onto for a while also. Sometimes you just gotta hold onto cool things until the mood strikes ya, I guess. So I decided to mesh the toile and bunny buttons, and to tie them together, Id use a pale pink cotton interlock. I decided to use a one inch grosgrain ribbon for the straps, and a one inch lace for the trim around the top and the straps. The lace is super cute, and its sorta sparkly iridescent. I used a pretty basic pattern for the main idea of the dress. Its overall a babydoll dress. This allowed me to have the pieces of the dress pretty close to the size they were going to be in the end result. All the trim and stuff I kinda had to figure out for myself and I had to reshape the bust a little bit because it called for putting darts into it if it was cotton (which I was using a knit). I think the dress probably took me about 3-4 hours total, but I take a lot of breaks while making it to take care of the kids and do other things. Still it was done in one day.


Thursday, May 20, 2010
Zippered Pouch Tutorial, as promised ;)

I'll do my best to explain this, but it really is pretty simple. I can do them without any directions now.
First things first. Cut out your fabric into the desired size. I usually take a piece of paper, fold it down to the approximate size I want my pouch to be. I also buy a 7 inch long zipper in a coordinating color to match whatever fabric Im using. The 7 inch zipper works for me, with the piece of paper Im using as my pattern. You will need to cut out 2 pieces of fabric for your lining, and 2 pieces of fabric for the outside of your pouch.
Ok, first actual step for sewing. lay 1 piece of your lining down, pattern facing UP. Then lay your zipper along the edge.

Now, you'll lay your outer fabric piece down, pattern facing DOWN. Pin both pieces of fabric to the zipper, as straight as you can get it.

Sew a line, as close to the zipper as possible. My sewing machine has left and right alignment, so I just adjust it to the one that is closest to the zipper at that time. Also, when I get close to the zipper, I drop my needle, and lift the foot, and unzip the zipper, so it stays out of my way while Im sewing. Then drop the foot, and keep going.

Open up the fabric you just sewed, and then iron it down. Then you will sew, the same line pretty much, but now with your fabric opened up, to the right side. I put my needle alignment back to middle for this.

Now we are basically repeating the first few steps, but on the opposite side of the zipper. Lay your lining fabric down, pattern facing up. Lay down the piece you've already sewn. Lay down your outer fabric, pattern facing down. Pin along the zipper.

Sew along the zipper line, same as before. Then open it up, iron it down, and then sew that line again. Once you've finished that you're project should look like this.

Unzip it about half way. This will make it a million times easier when we get a little farther into the project.

Open up both ends, so that the matching fabric prints are both facing in towards each other. Line up the fabric that is your lining. Pin both of the short sides. When you get ready to sew it, make sure you've folded the zipper down towards the lining fabric, on both sides. I couldn't figure out how to take a picture of this step, you'll just have to know it when you see it.

Sew a line down each side. Make sure to go forward and backward along the zipper ends that you folded down.
 Now, we're going to pin the outer fabric side. This time though, we are pinning it all the way around.
Sew all the way around all 3 edges. I usually run over the zipper edges again, just to make sure it's all secure.

This part is where leaving the zipper half unzipped is gonna come in handy. Flip your bag right side out, but leave the lining hanging out.

Fold the lining in, so there are no unfinished edges showing, and then pin it. Sew a line as close to the edge as you can. This seals your pouch.

Push the lining back into the bag. And voila, you've just made a pouch.

Zip it up, and you're ready to go.

Wednesday, May 19, 2010
Im feeling saucy ;)
Tonight, I sorta cheated and added a new recipe to my queue, used another one that I just made, and added one from my list that I hadn't made yet. Its my damn list though, and I'll do it as I please!
I made a Chicken with Red Wine Sauce tonight as the main dish. Gotta use up all the Merlot I bought for the cake! I like that this website, has a spot where you can enter how many servings you want, and !POOF! it will calculate all the ingredients up for you! I still did tweaking though, because I'm like that. I had 1 1/2 pounds of chicken breasts, so I just switched up the serving size to 6 to basically cut the recipe in half for me. I followed most of it pretty closely. I did use 2 tablespoons of the olive oil, because the amount it was giving me seemed pretty ridiculous. I also read several of the reviews for it, and cut the amount of brown sugar down a little bit more, so I only ended up using probably 1/3 of a cup. Other than that though I followed the recipe, promise! It's kinda hard to make myself remember after sprinkling the paprika and sugar on the chicken, NOT to stir it up. Just let it sit there and soak in. I did think it was neat, after the simmering stuff was done, the bottom half of my chicken pieces were kinda reddish purple. :) The chicken was sweet and spicy at the same time, it was a super interesting and yummy flavor.
I ended up remaking the Parmesan Cheese Linguine because, DUH, its delicious! And I figured it would go good with the chicken and the Bruschetta I decided to make with it. The bruschetta, I didn't go full out special with it. I just bought Vienna Bread (its shorter and wider than French bread) because that's what the bakery had. I then bought pre-made basil pesto and Roma tomatoes. I already had mozzarella in my fridge so I figured I was good to go. I used to work at a pizza place for a few years, and this was the way we made bruschetta there. Simple simple. Take your bread slices, spread pesto on it, dice up tomatoes, put on bread, then top with shredded mozzarella. I set the oven on 350, and then just bake it long enough for the cheese to get good and melty.
Now, I'm not a tomato eater. Sure, I'll eat ketchup or spaghetti sauce, but is it really a tomato by then? Ramble ramble. Anyway, I totally enjoyed the bruschetta. Desi ate it also, and she'd never eaten tomatoes of any kind before. Neither kid ate the chicken, and believe me its not like I gave them a ton of it. I gave each of them one small piece and they still couldn't eat it. Parker did eat all of his noodles though, although he did tell me, in his own special way of trying to wipe at his tongue with a towel, that it was too peppery for him.

I made a Chicken with Red Wine Sauce tonight as the main dish. Gotta use up all the Merlot I bought for the cake! I like that this website, has a spot where you can enter how many servings you want, and !POOF! it will calculate all the ingredients up for you! I still did tweaking though, because I'm like that. I had 1 1/2 pounds of chicken breasts, so I just switched up the serving size to 6 to basically cut the recipe in half for me. I followed most of it pretty closely. I did use 2 tablespoons of the olive oil, because the amount it was giving me seemed pretty ridiculous. I also read several of the reviews for it, and cut the amount of brown sugar down a little bit more, so I only ended up using probably 1/3 of a cup. Other than that though I followed the recipe, promise! It's kinda hard to make myself remember after sprinkling the paprika and sugar on the chicken, NOT to stir it up. Just let it sit there and soak in. I did think it was neat, after the simmering stuff was done, the bottom half of my chicken pieces were kinda reddish purple. :) The chicken was sweet and spicy at the same time, it was a super interesting and yummy flavor.
I ended up remaking the Parmesan Cheese Linguine because, DUH, its delicious! And I figured it would go good with the chicken and the Bruschetta I decided to make with it. The bruschetta, I didn't go full out special with it. I just bought Vienna Bread (its shorter and wider than French bread) because that's what the bakery had. I then bought pre-made basil pesto and Roma tomatoes. I already had mozzarella in my fridge so I figured I was good to go. I used to work at a pizza place for a few years, and this was the way we made bruschetta there. Simple simple. Take your bread slices, spread pesto on it, dice up tomatoes, put on bread, then top with shredded mozzarella. I set the oven on 350, and then just bake it long enough for the cheese to get good and melty.
Now, I'm not a tomato eater. Sure, I'll eat ketchup or spaghetti sauce, but is it really a tomato by then? Ramble ramble. Anyway, I totally enjoyed the bruschetta. Desi ate it also, and she'd never eaten tomatoes of any kind before. Neither kid ate the chicken, and believe me its not like I gave them a ton of it. I gave each of them one small piece and they still couldn't eat it. Parker did eat all of his noodles though, although he did tell me, in his own special way of trying to wipe at his tongue with a towel, that it was too peppery for him.

Tuesday, May 18, 2010
I'm still alive!
Tonight for dinner, I went for something I pretty much know how to do by heart now. I found this recipe online about 2 months ago, and its super easy. Its just a simple Steak strips and Rice. I started out making this back then, because I wanted steak, and my husband either wasn't getting home till later, or didn't want to grill out. Either way, doesn't matter. I'm now a steak strips pro. Matt loves it, and on a rare occasion, Desi will eat some of the steak and rice. Parker on the other hand will only eat the rice. Go figure. I do always add some butter to the rice after its done cooking for a little more flavor. I didn't take pictures of it though tonight. I'm slacking. Frankly, I wasn't really thinking about it.
As for the side item, I made the dreaded Broccoli and Cheese, from my recipe "to do" list. Matt likes broccoli, I do not. Frankly, its pretty much up there with seafood, meaning I can't even stand the smell of it, typically. But, Matt called me on his way home from work, letting me know he pulled a muscle in his back, so I decided to at least make dinner nice for him, and seeing as this was on my list of recipes to try, tonight is as good as any night. Might as well get it over with for me.
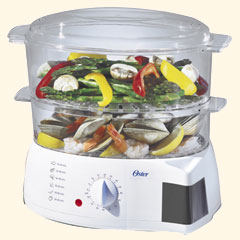
I used a steamer to cook the broccoli (looks like this). I got it back when the kids were babies, and I was making their baby food. (PS, making baby food without the steamer would have been hell) Anyway, I think it might have steamed for like 10 minutes or so. Then I melted about 2 tablespoons of butter in the microwave. I transferred the broccoli into a microwaveable bowl and then poured the butter on it, then put a handful of shredded cheddar cheese it. Nuked it for a minute and voila.... broccoli and cheese. Now, I'm not gonna lie. I really did almost skip putting the broccoli on my plate altogether after putting my steak strips and rice on there. But I figured I'd better at least try it, so that one day when my kids are actually WILLING to try it, I can say I've done it as well. Turns out, its edible. The bushy part is better tasting than the stem part. And I wish I would have done a bigger handful of cheese. I think I liked that the bushy part soaked up the butter, so it had some flavor other than "green".
So, am I willing to eat it again? Sure, if the kids are around, haha. I'm probably not going to order it off a menu or eat it on my own volition. But I guess if I make it for Matt, I can at least put it on my plate also, so when the kids are looking at me like I'm crazy for putting something gross on their plates, at least its on mine also.
As for the side item, I made the dreaded Broccoli and Cheese, from my recipe "to do" list. Matt likes broccoli, I do not. Frankly, its pretty much up there with seafood, meaning I can't even stand the smell of it, typically. But, Matt called me on his way home from work, letting me know he pulled a muscle in his back, so I decided to at least make dinner nice for him, and seeing as this was on my list of recipes to try, tonight is as good as any night. Might as well get it over with for me.
I used a steamer to cook the broccoli (looks like this). I got it back when the kids were babies, and I was making their baby food. (PS, making baby food without the steamer would have been hell) Anyway, I think it might have steamed for like 10 minutes or so. Then I melted about 2 tablespoons of butter in the microwave. I transferred the broccoli into a microwaveable bowl and then poured the butter on it, then put a handful of shredded cheddar cheese it. Nuked it for a minute and voila.... broccoli and cheese. Now, I'm not gonna lie. I really did almost skip putting the broccoli on my plate altogether after putting my steak strips and rice on there. But I figured I'd better at least try it, so that one day when my kids are actually WILLING to try it, I can say I've done it as well. Turns out, its edible. The bushy part is better tasting than the stem part. And I wish I would have done a bigger handful of cheese. I think I liked that the bushy part soaked up the butter, so it had some flavor other than "green".
So, am I willing to eat it again? Sure, if the kids are around, haha. I'm probably not going to order it off a menu or eat it on my own volition. But I guess if I make it for Matt, I can at least put it on my plate also, so when the kids are looking at me like I'm crazy for putting something gross on their plates, at least its on mine also.
Shake shake shake.....
Monday night, we ended up making cheeseburgers, and instead of doing the regular french fries, I decided to go ahead and try the Cajun Fried Potato Wedges. Sounds like a suitable substitute. First off, I have no idea where to buy rice flour, so I just stuck with the self rising flour.
Well I did the coating them with the spices, and sugar and salt by dumping them all into a giant zip lock bag, and then shaking them up. Easy right? "Its shake n bake... and I helped!" Anyway, started the fryer, and then started taking the wedges out and coating them in the flour and then dropping them in the fryer. No big thang..... Well I just left the wedges I wasn't frying at the moment in the zip lock bag. As time went on, the wedges started creating this lake of Cajun spicy goodness, instead of sticking to the potato wedges. WTF? Darn sweaty potatoes! So, next time I do this, I guess I'll coat them and then lay them on a plate or something away from the sauna-like confines of the plastic bag. :/ Needless to say, the first batch of potato wedges were yummy in a spicy way. The second and third batches were yummy in a flour battered way. Either way they were good, but if you want the darn seasoning flavor you put the work into, don't leave them in the bag to sweat it out.

Well I did the coating them with the spices, and sugar and salt by dumping them all into a giant zip lock bag, and then shaking them up. Easy right? "Its shake n bake... and I helped!" Anyway, started the fryer, and then started taking the wedges out and coating them in the flour and then dropping them in the fryer. No big thang..... Well I just left the wedges I wasn't frying at the moment in the zip lock bag. As time went on, the wedges started creating this lake of Cajun spicy goodness, instead of sticking to the potato wedges. WTF? Darn sweaty potatoes! So, next time I do this, I guess I'll coat them and then lay them on a plate or something away from the sauna-like confines of the plastic bag. :/ Needless to say, the first batch of potato wedges were yummy in a spicy way. The second and third batches were yummy in a flour battered way. Either way they were good, but if you want the darn seasoning flavor you put the work into, don't leave them in the bag to sweat it out.

Monday, May 17, 2010
Just another Manic Monday....
When I was little (like age 2-8 maybe) and lived in Germany, my Oma used to make me a Red Wine Cake at least once a week. I LOVED them. They were so good. My mother says it was probably a cake out of a box, like Betty Crocker or Duncan Hines would be in America, but I don't care, it was still awesome. For the longest time I'd had a lot of trouble finding anything close to it as a substitute, until I started looking around online for different recipes.
This morning, I decided to make the Chocolate Bundt Cake. I mostly used one recipe (recipe #1), but borrowed a little info from another one (recipe #2). Links included.
I followed the first recipe almost to the letter. I did use 2% milk instead of 1% (don't know if it really matters). And instead of using just 6 ounces of chocolate to melt, I went ahead and used the full 8 ounces that were in the box. I figured, what's the difference? When it was time to add the liquor, the first recipe didnt actually specify how much to use, so I looked at "recipe #2" and they said they used 1 1/2 cups. My batter was pretty liquidy already, so I just used 1 cup. I bought a Merlot, to use for my cake.

So I think my cake ended up having to cook about 55 minutes. It started to bubble over the top of the pan, and came close to touching the top of my oven, so I hurried up and lowered the rack. Something that I'll probably do at the start of cooking next time instead of in the middle. Things to remember, I guess.

It took FOREVER for this sucker to cool off. The recipe said after 20 minutes of cooling to turn it out of the pan and let it finish cooling on a rack. My cake was not coming out of that pan to save its life. So I let it sit in the pan for about an hour and a half. Even then, I had to get a knife and jiggle it along the sides of the cake, as per someone's suggestion. (Thanks Alka) Didnt come out competely pretty, but I figure I'll be covering it anyway here shortly, so it'll survive. Desi did enjoy eating all the pieces that didn't come out of the pan though. Note to self, grease that pan and flour it better than I did. Apparently what I thought was good enough, was not as good as it could have been.

After I finally got my cake out of the pan, I start to melt another box of chocolate for the topping. Pouring it onto the cake, I realized it doesn't do the pretty "drizzle down the sides" thing unless you pour A LOT in one area. Overall, I still think it came out pretty. After the chocolate drizzle, I put some powdered sugar in my hand and blew it onto the cake. Raspberries would probably be really pretty and tasty on there also. Maybe next time. So all in all, after tasting the cake, I think its just as good, if not better than the cake I had when I was little. Its really moist (haha) and delicious.

This morning, I decided to make the Chocolate Bundt Cake. I mostly used one recipe (recipe #1), but borrowed a little info from another one (recipe #2). Links included.
I followed the first recipe almost to the letter. I did use 2% milk instead of 1% (don't know if it really matters). And instead of using just 6 ounces of chocolate to melt, I went ahead and used the full 8 ounces that were in the box. I figured, what's the difference? When it was time to add the liquor, the first recipe didnt actually specify how much to use, so I looked at "recipe #2" and they said they used 1 1/2 cups. My batter was pretty liquidy already, so I just used 1 cup. I bought a Merlot, to use for my cake.

So I think my cake ended up having to cook about 55 minutes. It started to bubble over the top of the pan, and came close to touching the top of my oven, so I hurried up and lowered the rack. Something that I'll probably do at the start of cooking next time instead of in the middle. Things to remember, I guess.

It took FOREVER for this sucker to cool off. The recipe said after 20 minutes of cooling to turn it out of the pan and let it finish cooling on a rack. My cake was not coming out of that pan to save its life. So I let it sit in the pan for about an hour and a half. Even then, I had to get a knife and jiggle it along the sides of the cake, as per someone's suggestion. (Thanks Alka) Didnt come out competely pretty, but I figure I'll be covering it anyway here shortly, so it'll survive. Desi did enjoy eating all the pieces that didn't come out of the pan though. Note to self, grease that pan and flour it better than I did. Apparently what I thought was good enough, was not as good as it could have been.

After I finally got my cake out of the pan, I start to melt another box of chocolate for the topping. Pouring it onto the cake, I realized it doesn't do the pretty "drizzle down the sides" thing unless you pour A LOT in one area. Overall, I still think it came out pretty. After the chocolate drizzle, I put some powdered sugar in my hand and blew it onto the cake. Raspberries would probably be really pretty and tasty on there also. Maybe next time. So all in all, after tasting the cake, I think its just as good, if not better than the cake I had when I was little. Its really moist (haha) and delicious.

Friday, May 14, 2010
Fancy Friday
Tonight I decided to make the Bacon wrapped chicken stuffed w/ asparagus and mozzarella and Parmesan cheese linguine for my family and a few friends. (Click recipe title to be directed to where I got the recipe)
I started out by assembling the chicken dish in the morning, just so it would save me headache and time later in the evening. I get kinda stressed out when I feel like Ive got too much going on with the kids and such while I'm trying to cook, so doing this is a life saver if its ever possible for me to do it. Anyway, rambling..... So I didnt have 2 pounds of chicken in the fridge, I had 1 1/2. But I figured it should be easy enough to wing it. It turns out that what I had was 3 chicken breasts. The recipe says to cut it thin 2-3 times. I did the math, and to yield the amount that would have been correct with the amount of chicken I had, I'd need to cut each piece of chicken into 4 pieces. I'm a genius like that. Then I prepped the asparagus and scallion. I decided to only put one piece of asparagus in each chicken wrap, and one scallion strip, so I only washed 6 pieces of asparagus/scallion. So when it comes to assembling, its kinda like making a sandwich. Chicken, asparagus, scallion, mozzarella, chicken, then wrap that sucker up with bacon. I ended up needing two pieces of bacon per chicken wrap up, because they are pretty long. My version made 6 pieces of chicken wrap ups. Here is the finished prepped chicken.

When it came time for dinner, it was super easy to just pop this in the oven for 30 minutes while I started the linguine. Linguine noodles are pretty cut and dry, boil til al dente, then drain. I heated up the olive oil and garlic in the pan. I'm an idiot who apparently didn't fully read the recipe, and bought a jar of minced garlic, not whole garlic, but measured out the equivalent. It worked out fine. Add the other ingredients...... then finally the noodles and you're done. Now..... mine didn't turn out quite as pretty as the original recipe's photo. My Parmesan melted and started clumping together. My husband thought I'd added chicken pieces to the noodles, because that's what the clumps looked like to him. It was really good though.

Just as the linguine was finished, the chicken was ready to come out of the oven. It was SO good. I'm not gonna lie, I was totally impressed with myself. My husband even didn't mind the asparagus, because he said it wasn't a ton of it by itself. So overall I'd say these two recipes were a hit, even though my kids ate peanut butter and jelly, and they can be remade eventually. Desi did eat some of the noodles off my plate at least...... small victories. ;)

I started out by assembling the chicken dish in the morning, just so it would save me headache and time later in the evening. I get kinda stressed out when I feel like Ive got too much going on with the kids and such while I'm trying to cook, so doing this is a life saver if its ever possible for me to do it. Anyway, rambling..... So I didnt have 2 pounds of chicken in the fridge, I had 1 1/2. But I figured it should be easy enough to wing it. It turns out that what I had was 3 chicken breasts. The recipe says to cut it thin 2-3 times. I did the math, and to yield the amount that would have been correct with the amount of chicken I had, I'd need to cut each piece of chicken into 4 pieces. I'm a genius like that. Then I prepped the asparagus and scallion. I decided to only put one piece of asparagus in each chicken wrap, and one scallion strip, so I only washed 6 pieces of asparagus/scallion. So when it comes to assembling, its kinda like making a sandwich. Chicken, asparagus, scallion, mozzarella, chicken, then wrap that sucker up with bacon. I ended up needing two pieces of bacon per chicken wrap up, because they are pretty long. My version made 6 pieces of chicken wrap ups. Here is the finished prepped chicken.

When it came time for dinner, it was super easy to just pop this in the oven for 30 minutes while I started the linguine. Linguine noodles are pretty cut and dry, boil til al dente, then drain. I heated up the olive oil and garlic in the pan. I'm an idiot who apparently didn't fully read the recipe, and bought a jar of minced garlic, not whole garlic, but measured out the equivalent. It worked out fine. Add the other ingredients...... then finally the noodles and you're done. Now..... mine didn't turn out quite as pretty as the original recipe's photo. My Parmesan melted and started clumping together. My husband thought I'd added chicken pieces to the noodles, because that's what the clumps looked like to him. It was really good though.

Just as the linguine was finished, the chicken was ready to come out of the oven. It was SO good. I'm not gonna lie, I was totally impressed with myself. My husband even didn't mind the asparagus, because he said it wasn't a ton of it by itself. So overall I'd say these two recipes were a hit, even though my kids ate peanut butter and jelly, and they can be remade eventually. Desi did eat some of the noodles off my plate at least...... small victories. ;)

Thursday, May 13, 2010
Round One Selection
Tired of cooking the same old things; tacos, spaghetti, chicken alfredo, jumbo stuffed shells, etc. Even more tired of the fact that half the stuff I do make, the kids won't eat, or if they do decide to eat it, they just pick at it. Maybe they are tired of me making the same stuff also. I decided that instead of just always looking at online recipes I'd actually start picking some out and using them. I don't really care if they eat it or not anymore, its not like that will be a huge change, haha. I like to think my husband will eat the new foods, but he can be pretty picky sometimes also.
We don't eat many vegetables as a family. Matter of fact, we barely eat any aside from corn or green beans that come from a can. It's always been about being easy and quick at dinner time. Lately Ive been trying to figure out how to get us to eat more. Asparagus is the first vegetable that I'm determined to get us to like. I have no idea why I chose it, it just stands out to me. So, one of my recipes choices reflects my "Asparagus Attempt". I'll list all the recipes that I've chosen for my first round of cooking.
Bacon wrapped chicken stuffed w/ asparagus and mozzarella
Chocolate bundt cake
Roasted potatoes w/ butter & parmesan
Parmesan cheese linguine
Cajun fried potato wedges
Broccoli & cheese
Bruschetta
Now I realize that broccoli and cheese doesn't sound that unique or fancy, but when you don't eat it, and probably don't like it..... we'll just say it sounds overly fancy to me. The rest of it is pretty fancy for my house though. I went grocery shopping for this list, and I had almost nothing in my pantry for any of it, so it was a pretty expensive trip. Things like sea salt, white pepper, and extra virgin olive oil somehow were not things I normally buy. I hope in the long run I find several other recipes that use these items, so they don't go to waste.
We don't eat many vegetables as a family. Matter of fact, we barely eat any aside from corn or green beans that come from a can. It's always been about being easy and quick at dinner time. Lately Ive been trying to figure out how to get us to eat more. Asparagus is the first vegetable that I'm determined to get us to like. I have no idea why I chose it, it just stands out to me. So, one of my recipes choices reflects my "Asparagus Attempt". I'll list all the recipes that I've chosen for my first round of cooking.
Bacon wrapped chicken stuffed w/ asparagus and mozzarella
Chocolate bundt cake
Roasted potatoes w/ butter & parmesan
Parmesan cheese linguine
Cajun fried potato wedges
Broccoli & cheese
Bruschetta
Now I realize that broccoli and cheese doesn't sound that unique or fancy, but when you don't eat it, and probably don't like it..... we'll just say it sounds overly fancy to me. The rest of it is pretty fancy for my house though. I went grocery shopping for this list, and I had almost nothing in my pantry for any of it, so it was a pretty expensive trip. Things like sea salt, white pepper, and extra virgin olive oil somehow were not things I normally buy. I hope in the long run I find several other recipes that use these items, so they don't go to waste.
“A journey of a thousand miles must begin with a single step.” Lao Tzu
I'm no Blogger, but I am an Elitist menu planner with a mind for design. Whether with the medium of food or cloth, I strive to make my hobbies shit all over yours. I'll also skate all over your fingers....Okay...Not actually. In truth, I am a stay at home mom, who's imagination takes shape through cooking and sewing.
Subscribe to:
Posts (Atom)